

Window flashing is an important component of any home build or remodel. Too many people forget or just don’t know how to properly flash a window, so we thought we’d give you a little introduction to the basics of window flashing. If you have any questions about window flashing at the end of this guide, be sure to refer to your window’s manufacturer guidelines, or feel free to give the Zeeland Lumber & Supply team a call for a little help. Let’s get started:
What is Window Flashing?
Window flashing is a weather-repellent material that is installed around a window unit to protect both the window and the window framing from water damage.
When is Window Flashing Installed?
Window flashing is installed at the same time as the window unit. Typically, flashing a window is a two-part process. The first half of window flashing occurs when you or your builder preps the rough opening for the window’s installation. The second half of window flashing occurs once the window unit is secured and squared within the rough opening.
Window Flashing Terms to Know Before You Start:
- Drip Cap – An aluminum attachment installed on the very top of a window unit. Works to stop water from seeping and pooling at the top of a window unit. Minimizes the potential for water damage.
- Flashing – A water-repellant adhesive that’s applied over window flanges and sheathing to seal out any potential leaks in or around a window.
- Head Jamb – The top of a rough opening. This is where the top of a window unit goes when installing.
- Jambs – The vertical sides of a window opening.
- Rough Opening – The opening left for a window when a home was framed. It looks like an open square in a framed wall panel, and has special reinforcements to properly hold in a window unit. Learn more about framing basics and rough openings here.
- Sill – The bottom edge of a window rough opening. This is what the window unit rests on when it’s installed.
- Window Unit – The entire window, from the frame that holds in all of the components of the window to the sash and glass that make the window function. All combined, these parts make up the entire window unit.
- WRB – Weather Resistive Barrier, also known as house wrap. This is a thin, weather-resistant sheet of material that’s wrapped around a home before windows, casing, or siding is installed. It affords your home another layer of protection from the elements.
How is Window Flashing Installed?
Every window manufacturer offers specific instructions for flashing around a particular window unit. Depending on the type of window, its construction, and its shape, window flashing may follow a few different steps. It’s always best to follow manufacturer instructions whenever possible. To give you a general idea of the window flashing process, here’s a basic step-by-step for installing window flashing for a rectangular window in a residential home.
1. Cut back WRB (weather resistive barrier)
a) Your WRB should be wrapped over the rough opening of the window. When you’re ready to install the window
unit, you’ll cut back the WRB.
b) First, make a vertical cut in WRB at the center of the window opening, from the top of the opening to the
bottom. Then, make horizontal cuts along the top and bottom of the window opening, pulling those two side
flaps back from the opening, and securing them with a small piece of tape for now.
c) Make 45 degree cuts away from the corners on the top of the rough opening. When you fold and tape the flap
at the top of the rough opening, you should end up with something that looks like this.
(Photo courtesy of Marvin Windows)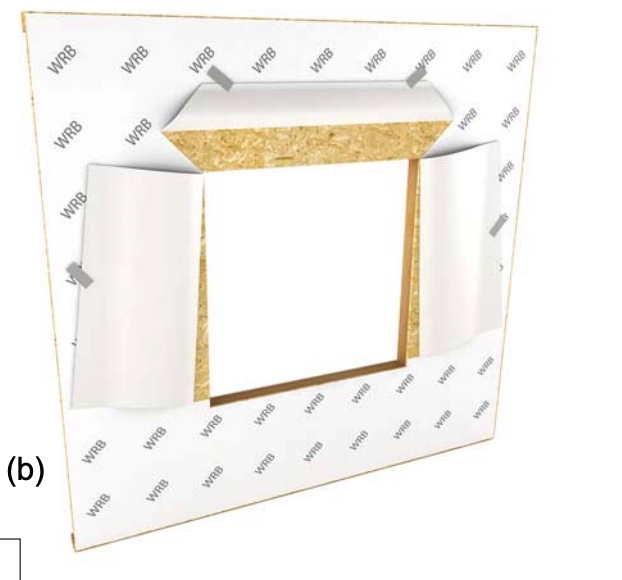
2. Install the sill pan flashing.
a) When installing sill pan flashing, or the flashing at the bottom of the window, you have a few options in the
material. You can use adhesive peel and stick flashing, or you can opt for a pre-shaped sill pan, which will help
collect water and direct any runoff away from your home safely. This instructional diagram from Marvin
Windows shows another option, a combination of a sill wedge and self-sealing adhesive flashing.
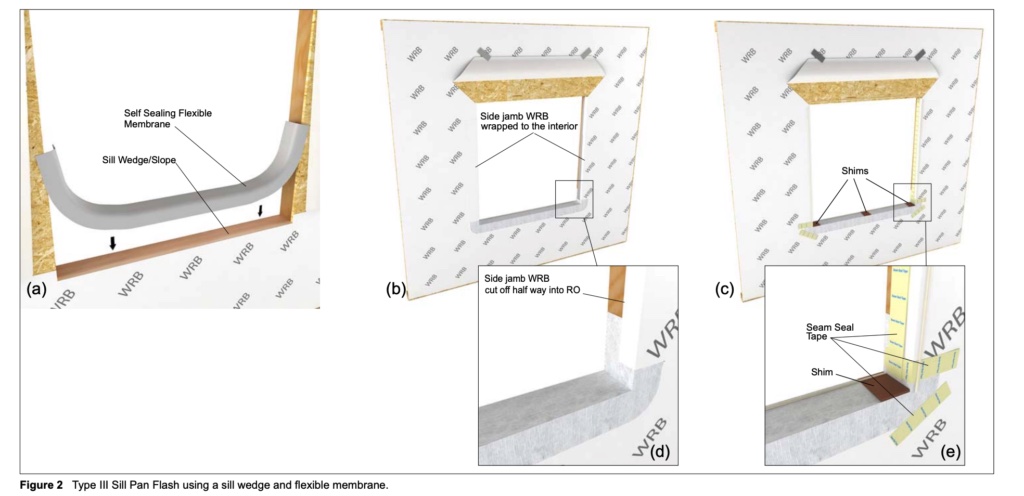
b) Choose the sill pan flash option that’s recommended by your manufacturer. If using peel and stick window
flashing, ensure that the flashing extends the full length of the sill and up at least six inches on either window
jamb side.
3. With the sill pan flashing done, wrap the side WRB panels around to the interior of the rough opening and secure, as
shown in figure (b).
4. Apply sealant
a) With WRB secured and sill flashing in place, you can now apply a small bead of sealant in preparation for the
window unit.
b) Do not apply sealant to the bottom or sill of the window rough opening. The bottom of the window must
remain open so water does not become trapped within the window unit.
c) Apply sealant on top and sides of the window rough opening. Start ¾” of an inch from the corner on each side,
and stop ¾” from the end of each side. This will allow for any water that does enter the unit to escape easily and
without damage. If you seal all the way around each corner, water will be trapped in the window unit and can
cause mold and wood rot.
5. Install window unit.
a) At this point, you can install your window unit. Follow manufacturer instructions, or check out this blog for
more information on properly installing a window unit. Ensure that the window is plumb and square before
finishing your window flashing.
6. Insulate around window unit.
a) Follow manufacturer instructions, using either expanding spray foam or fiberglass insulation.
7. Apply peel and stick flashing to window jambs, extending flashing beyond the sill, and 4 to 5 inches above the top of the
window.
8. If your window has come with a drip cap, now’s the time to install it.
a) The head jamb of a window is the most vulnerable to water damage. That’s why many manufacturers provide
drip caps with their windows. Drip caps are fastened to the sheathing directly above a window and protrude
slightly to keep water from entering the window unit. If your windows do not come with drip caps, you can
purchase them from your local supplier, or fashion your own with aluminum coil and peel and stick flashing.
b) Install the drip cap according to manufacturer instructions. Most windows that come with drip caps are
manufactured in a way that the drip cap will fit conveniently at the top of the window. If using your own drip
cap, simply adhere the piece directly above the window so that any water will flow away from the wall and
window unit, and out onto the glass of your window.
9. Apply head jamb flashing and finish up.
a) The final step is to apply the head jamb flashing. This strip of flashing should go horizontally across the top of
the window unit, extending at least six inches beyond the window jambs.
b) With that, you can fold down the top flap of WRB, tape it in place, and you’re all set.
At this point, you’ve completed your window flashing, and your window is ready for casing and siding.
Window flashing is an important step in the home construction process. Too many people don’t know how to or forget to flash windows properly, which can lead to costly water damage within your home. By following these simple steps, and taking just a little extra time when installing your windows, you can ensure that the home you’re building or remodeling is watertight and secure for years to come.
Getting ready to install windows on a new home or remodel? Zeeland Lumber & Supply can help! We have all the supplies you need, from top-of-the-line window selections to simple, peel and stick flashing adhesive. Start your next project off on the right foot — get everything you need at Zeeland Lumber & Supply. For the window flashing supplies you need, give us a call at (888) 772-2119 or stop into one of our locations today.
